How To Stretch Pizza Dough: #1 Guide On The Internet For You
Are you tired of buying pizza and having it be too doughy or too thin? Do you ever feel like your pizza crust is too thick or not crispy enough? You’re not alone.
Making pizza at home is a fun and easy way to enjoy your favorite food. Pizza dough is a versatile and forgiving ingredient that can be used to make a variety of different dishes. When you are craving a pizza, the last thing you want to do is wait for the dough to rise.
But, You’ve been rolling your dough out with a rolling pin and swearing at it for years. So, how to stretch pizza dough?
Don’t worry! In this post, we will show you how to stretch pizza dough so that you can create your very own pizzas at home.
By following our step-by-step instructions, you will be able to make the perfect pizza every time. So, what are you waiting for? Start stretching some pizza dough today!
Importance Of Pizza Dough Stretch
Before we get into the step-by-step instructions, let’s take a minute to discuss the importance of stretching pizza dough. Properly stretched pizza dough will result in a thin and crispy crust that is full of flavor. A poorly stretched dough will lead to a thick and chewy crust that is difficult to bite into.
When it comes to stretching pizza dough, there are a few key things to keep in mind:
1) Use plenty of flour – This will help keep the dough from sticking to your hands or the table.
2) Don’t overwork the dough – Overworking the dough will make it tough and chewy.
3) Use a gentle touch – much force will cause the dough to become tough and brittle.
4) Allow the dough to rest – This will help ensure that your crust is crispy and not tough.
The bottom line is, stretching the dough will make it easier to work with and create a more uniform shape. You can also use this technique for pizza crusts or breadsticks, so feel free to experiment on your own!
Now that you know the importance of stretching pizza dough, let’s get started with the step-by-step instructions!
How To Stretch Pizza Dough: Detailed Steps
What you need to stretch pizza dough
- A rolling pin
- A bowl of flour
- A kitchen scale (optional)
- A pizza stone (optional)
Tools for stretching pizza dough by hand
- A large clean surface
- Plenty of flour
Step-by-step Guide To Stretch Pizza Dough
If you are looking for a way to enjoy a delicious homemade pizza, look no further than how to stretch pizza dough! With just a few simple steps, you will be able to create the perfect pizza every time. So, what are you waiting for? Start stretching some pizza dough today!
Step 1: Prepare the Dough
Start by preparing your pizza dough. If you are using a store-bought dough, follow the instructions on the package. If you are making the dough from scratch, make sure to read our post on How To Make Pizza Dough.
Step 2: Sprinkle Flour On The Work Surface
Once your dough is ready, sprinkle some flour on your work surface. This will help keep the dough from sticking to your hands or the table.
Step 3: Place The Dough On The Floured Surface
Place the dough on the floured surface and use your hands to shape it into a ball.
Step 4: Use A Rolling Pin To Roll The Dough Out
Place the rolling pin in the middle of the dough and use gentle pressure to roll it out. Make sure to keep the rolling pin moving so that you don’t crush the dough.
Step 5: Rotate The Dough As You Roll It Out
As you roll the dough out, make sure to rotate it so that it spreads evenly. If the dough starts to stick to your work surface, add more flour.
Step 6: Lift The Dough And Flip It Over
Once you have rolled the dough out into a thin circle, lift it up and flip it over so that both sides are equally thin.
Step 7: Place The Dough Back On The Floured Surface
Place the dough back on your floured surface and continue to roll it out until it is thin enough to stretch.
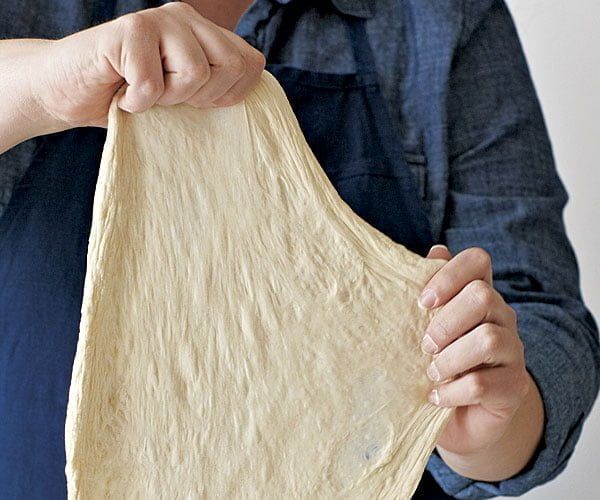
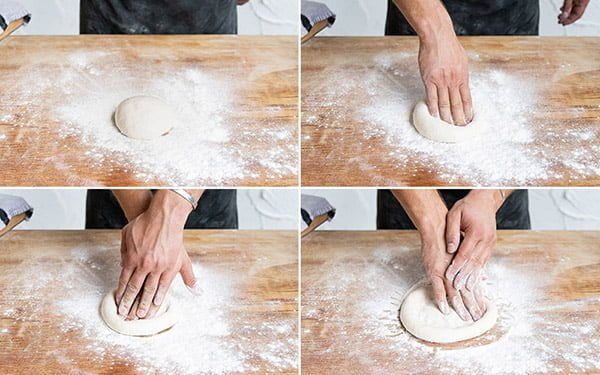
Step 8: Stretch The Pizza Dough
Once your dough is thin enough, place both hands in the middle of the dough circle. Using gentle pressure, start to stretch the dough by pulling your hands apart. You should be able to stretch the pizza dough into a thin rectangle by rotating it at this point.
Step 9: Transfer To The Pizza Stone
Once your pizza crust has reached its desired thickness, transfer it to a pizza stone or baking sheet. Alternatively, you can also use an upside down cookie sheet if you don’t have a pizza stone on hand!
Step 10: Top Your Pizza
Top your pizza dough with whatever toppings you would like! Make sure to avoid putting too much sauce on the pizza, as this will make it more difficult to stretch.
Step 11: Bake The Pizza
Transfer the baking sheet or pizza stone into an oven heated at 500 degrees Fahrenheit and cook for about eight minutes until the crust is golden brown. At this point, remove your pizza from the oven and let it cool slightly before eating. If you are using a baking sheet, use a large spatula to lift up the edge of the crust so that you can check if it is fully cooked on the bottom.
Methods To Stretch Pizza Dough
Stretching pizza dough is an art.
There are several methods for stretching it, but they all require the same preparation: before starting make a batch of your favorite pre-made or homemade dough and when complete look for one that feels springy but not sticky; follow all rise times to ensure you have soft pliable dough ready in time!
Most grocery stores carry balls made from store bought ingredients near produce sections while pizzerias offer them at just about any price point depending on location so be sure ask around first if unsure where best buy these items.
When you’re making pizza, it’s best to start with the dough. You want a crust that has just enough chew and texture so when cheese is layered on top for an excellent finish!
Allow your warm dough ball or let sit until cool before stretching out because this will make working much easier.
Here are 4 methods you can use when making your masterpiece:
1) Stretching Dough With A Rolling Pin
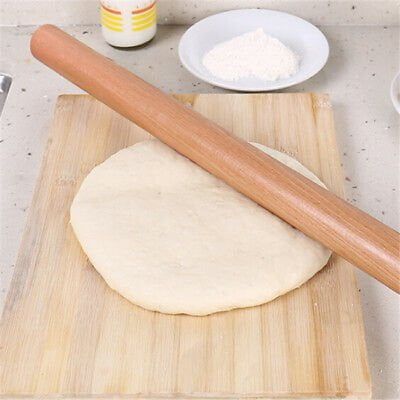
1. Wash your hands and make sure that you have plenty of room to work. This is important because it can be difficult to stretch the dough on a small table or countertop. Make sure there are no children or pets in the area, as this task can become dangerous very quickly if not performed properly.
2. Sprinkle some flour onto your clean working area and make sure that all of your personal belongings are out of the way (including any pets). If you aren’t using a pizza stone, place it near your working area so that you will be able to transfer the pizza dough onto it right after you finish stretching it.
3. Place the dough onto your working area and flour it generously to prevent any sticking. At this point, you can also sprinkle on some more flour on top of the dough if that is your preference.
4. Roll out the dough with your rolling pin until it has reached a circular shape (approximately 1/8-inch thick). When you are finished, place it onto your pizza stone or baking sheet so that you can “top” it later.
Please note: You may need to roll out your dough several times depending on how thick you prefer the crust.
As an alternative for those who do not have access to a kitchen scale, use measuring cups or spoons to measure out even amounts of flour and into separate containers before adding them to the dough.
This will help ensure that all of your dough is the same thickness.
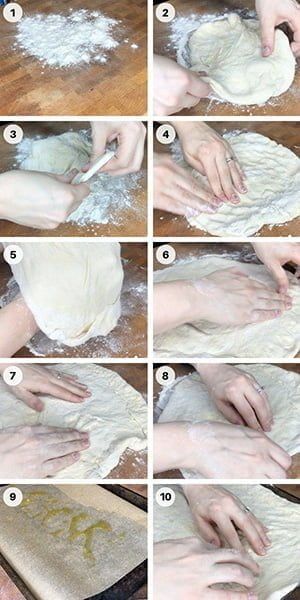
2) Stretching Pizza Dough By Hand
1. If you are not using a rolling pin, wash your hands and make sure that you have plenty of room to work (see above for instructions).
2. Place the dough on your working surface and flour it generously to prevent sticking.
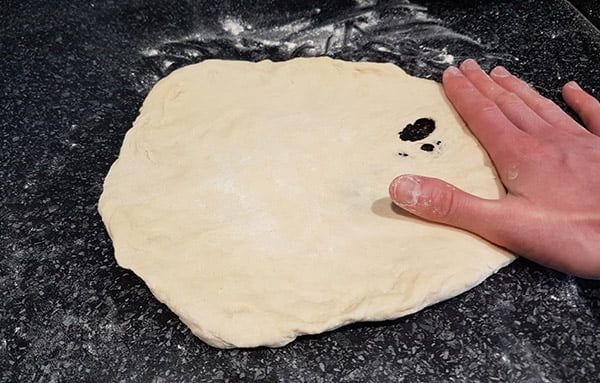
3. Use both of your hands to stretch the dough until it has reached a circular shape (approximately 1/8-inch thick). You may need to apply some pressure in order to achieve this. When you are finished, place it onto your pizza stone or baking sheet so that you can “top” it later.
4. Optional:
- Take a dough scraper and fold the dough over itself until it is approximately 1/8-inch thick. Take your fingertips and stretch it back to its circular shape.
- Repeat this at least 5 times until you notice that all of the little air bubbles have been removed from the dough.
- This technique will help create a more uniform thickness, which will result in a more evenly baked crust.
Please note: Depending on how much flour your working area has, you may need to sprinkle some additional flour onto the top of the dough or underneath it as needed.
If this is necessary, make sure to brush away any excess flour before placing toppings onto your pizza!
3) Fork Tines Method
1. Wash your hands and make sure that you have plenty of room to work (see above for instructions).
2. Place the dough onto your working area, flatten it out with your fingertips, and flour it generously. Fold the edges inwards so that they touch one another to form a ball shape.
3. Take a fork tine and press it into the center of the dough ball to create small indentations throughout the entire piece of dough without piercing all of the way through it (you may need to use additional forks depending on how much pizza you are making).
Once you are finished, place it onto your pizza stone or baking sheet like you would before topping it! The fork tines will help keep air bubbles from forming on the crust, which will help it cook more evenly.
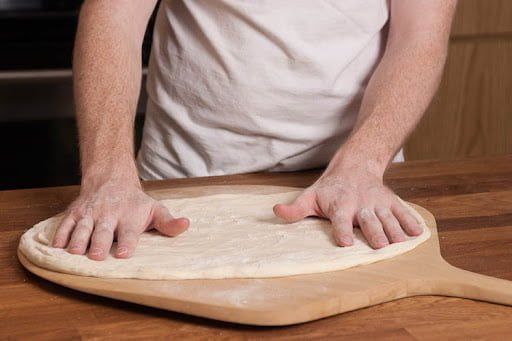
4) The Tear and Stretch Method
1. Wash your hands and make sure that you have plenty of room to work (see above for instructions).
2. Place the dough onto your working area, flatten it out with your fingertips, and flour it generously. Fold the edges inwards so that they touch one another to form a ball shape.
3. Take your hands and place them on opposite sides of the dough ball (one hand closer to you than the other). Stretch out one side at a time by pulling downwards with both hands (the farther away from you that your hands are, the more stretched-out you will make this side).
When you feel like you cannot stretch it any further without risking tearing, flip over dough ball and repeat on opposite side. Using this technique will help prevent thin spots or air bubbles within your pizza crust!
Now that you know how to stretch pizza dough, get cooking! You’ll be able to create a perfectly thin and crispy crust every time. Remember to use a gentle touch, and don’t be afraid to experiment with different toppings!
Top The Pizza
Now that you have finished stretching your pizza dough, feel free to sauce it and add on any toppings you like.
Place your pizza in a pre-heated oven and bake it for approximately 10 minutes, or until the cheese is bubbly and golden brown. You can then enjoy a delicious homemade pizza that is sure to please everyone!
These simple instructions about how to stretch pizza dough will ensure that you have a great time stretching dough with your children, even if they are just beginners at cooking.
Whether you’re looking for an easy way to introduce them to pizza making or a fun activity to do together, this is a wonderful project that both of you will love taking part in!
Should You Stretch Dough in the Air?
There is an ongoing debate about whether or not pizza dough should be stretched in the air.
Proponents of this method claim that it helps to create a thinner and more crispy crust, while others maintain that it is an unnecessary step that can lead to dough becoming misshapen.
If you are new to pizza making, we recommend sticking to one of the methods described above until you have some practice under your belt.
Once you become more comfortable with stretching dough, you may want to experiment with different techniques to see which one works best for you!
What If Pizza Dough Tears When Stretching It?
Sometimes, no matter how much you try to stretch dough out into a thin crust, it will inevitably tear. This is the most common problem that newbie pizza makers face while trying to create their own homemade pizzas.
If this happens, don’t stress out too much about it! Simply take some extra time to patch up the hole so your sauce doesn’t leak out during baking.
You can also poke some holes through the area where the dough has torn so any air bubbles can escape and your pizza won’t be undercooked in those areas.
When you are stretching pizza dough, there are several ways that people prefer to do it: on a well-floured surface with one’s hands; on top of one’s knuckles or fists, using gravity to stretch the dough out; or by hanging it in a window or a door frame.
The most important thing, however, is that you are careful not to overstretch the dough so it doesn’t tear!
How to Stretch Pizza Dough Without Tearing
Tearing pizza dough is one of the most common mistakes that people make when stretching it out. This can cause the crust to become misshapen or even tear completely apart. Here are a few tips to help you avoid this issue:
1) Make sure that your hands and working surface are both well-floured before you start stretching the dough. This will help to prevent it from sticking and tearing.
2) Use a gentle touch when stretching the dough, and try not to apply too much pressure. Overstretching can cause the dough to tear, so be careful not to go too far!
3) If the dough starts to tear, stop stretching it and try again later. It’s important not to get frustrated if you don’t get it right the first time – practice makes perfect!
4) If you do end up tearing the dough, simply patch it up with some extra flour and continue stretching. This will help minimize any rips or air bubbles that may have formed as a result of the tear.
5) Finally, remember that everyone’s pizza dough is different so there is no one-size-fits-all method for stretching it out. Be prepared to experiment a little bit until you find the technique that works best for you.
Stretching pizza dough is not always easy, but with patience and practice, you can do it! Follow these instructions to make sure your homemade pizzas are delicious and perfectly shaped every time.
Be sure to practice stretching dough until you feel confident in your abilities, and remember to use a light touch when doing so.
The more often you make pizza, the better you’ll become at stretching dough out without tearing (just like anything else in life)!
How to Fix Holes in Your Pizza Dough
If you’re unlucky enough to tear your pizza dough while stretching it out, don’t worry – there’s a way to fix it! Here are a few tips for patching up those pesky holes:
1) Use a bit of extra flour to patch up the hole. This will help to prevent the dough from tearing again and will also help keep the sauce from seeping through.
2) If the hole is large, use a fork to poke some holes in it before adding the extra flour. This will help the patch to stick better and will also allow the dough to cook evenly.
3) If the hole is small, simply cover it up with a bit of extra dough from the edges of your crust. This will help to balance out any area where the dough may have become misshapen.
4) Once the hole is patched up, continue stretching the dough until it is desired. Don’t worry if it’s not the same shape as the rest of your dough – pizzas are unique and irregularly shaped (just like people!).
5) Once you’ve patched everything up, place your pizza pan or stone in a cold oven and turn it up to the highest temperature.
Let it heat for at least 45 minutes, then preheat an empty burner on your stovetop before taking out your pizza to stretch and add toppings!
Now that you know how to stretch pizza dough without tearing it, try practicing these techniques until you’re confident with them!
Follow these instructions carefully so you can avoid making mistakes while stretching your dough. Remember that everyone’s pizza dough is different, so be prepared to experiment a bit until you find the method that works best for you.
And if all else fails, you just need to apply the fix mentioned above, simply patch up your dough with some extra flour and carry on!
Some Homemade Pizza Recipes
You have known how to stretch pizza dough, why not try out one of our delicious recipes? From classic pepperoni and cheese pizzas to more adventurous options like BBQ chicken or bacon ranch pizzas, we have something for everyone. So get creative and have fun with your pizzas!
Check out our favorite pizza recipes below:
1) Pizza dough artichoke pizza
This simple and delicious recipe for Italian inspired pizza is a great family meal! If you’re looking for something different to do with your homemade pizza crust, this is it! Your kids will love the subtle taste of artichokes on their pizza.
Ingredients:
- 1 batch of your favorite pizza dough (homemade or store-bought)
- 1/2 cup of marinara sauce
- 1/2 cup of artichoke hearts, diced
- 1/4 cup of shredded mozzarella cheese
- 1 tablespoon of grated Parmesan cheese
Directions:
1) Preheat oven to 425 degrees Fahrenheit.
2) Roll out your pizza dough on a lightly floured surface and transfer it to a greased pizza pan or stone.
3) Spread the marinara sauce evenly over the dough, then top with diced artichokes and cheeses.
4) Bake in preheated oven for 15-20 minutes, or until the crust is golden brown and the cheese is melted and bubbly. Enjoy!
2) Grilled vegetable pizza
This healthy and delicious grilled vegetable pizza is perfect for summertime! With a crispy crust and lots of fresh vegetables, it’s a great way to enjoy a lighter version of your favorite dish.
Ingredients:
- 1 batch of your favorite pizza dough (homemade or store-bought)
- 1/2 cup of tomato sauce
- 1/4 cup of diced red onion
- 1/4 cup of diced green bell pepper
- 1/4 cup of diced yellow bell pepper
- 1/4 cup of diced red grapes
- 1 tablespoon of olive oil
- 1 teaspoon of dried oregano
- 1/4 teaspoon of garlic powder
- Salt and pepper, to taste
Directions:
1) Preheat oven to 425 degrees Fahrenheit.
2) Roll out your pizza dough on a lightly floured surface and transfer it to a greased pizza pan or stone.
3) Spread the tomato sauce evenly over the dough, then top with diced red onion, bell peppers, grapes, olive oil, oregano, garlic powder, salt and pepper.
4) Bake in preheated oven for 15-20 minutes, or until the crust is golden brown and the vegetables are cooked through. Enjoy!
3) BBQ chicken pizza
This easy and delicious BBQ chicken pizza is perfect for a quick weeknight meal. With a few simple ingredients, you can have a delicious and satisfying pizza on your table in no time!
Ingredients:
- 1 batch of your favorite pizza dough (homemade or store-bought)
- 1/2 cup of BBQ sauce
- 1/2 cup of shredded cooked chicken
- 1/4 cup of diced red onion
- 1/4 cup of diced green bell pepper
- 1/4 cup of diced yellow bell pepper
- 1/4 cup of chopped cilantro
Directions:
1) Preheat oven to 425 degrees Fahrenheit.
2) Roll out your pizza dough on a lightly floured surface and transfer it to a greased pizza pan or stone.
3) Spread the BBQ sauce evenly over the dough, then top with shredded cooked chicken, red onion, bell peppers, cilantro, and salt and pepper, to taste.
4) Bake in preheated oven for 15-20 minutes, or until the crust is golden brown and the cheese is melted and bubbly. Enjoy!
4) Philly cheese steak pizza
This amazing Philly cheese steak pizza is a must-try for all cheese steak lovers! With gooey cheese and delicious steak toppings, it’s sure to satisfy your cravings!
Ingredients:
- 1 batch of your favorite pizza dough (homemade or store-bought)
- 1/2 cup of shredded mozzarella cheese
- 1/4 cup of thinly sliced cooked flank steak
- 1/4 cup of thinly sliced provolone cheese
- 1/4 cup of diced green bell pepper
- 1 tablespoon of grated Parmesan cheese
Directions:
1) Preheat oven to 425 degrees Fahrenheit.
2) Roll out your pizza dough on a lightly floured surface and transfer it to a greased pizza pan or stone.
3) Lay the mozzarella slices over the dough, then top with flank steak, provolone cheese, bell peppers and Parmesan cheese. (If you like mushrooms on your Philly cheese steaks, feel free to add them as well!)
4) Bake in preheated oven for 15-20 minutes, or until the crust is golden brown and the cheese is melted and bubbly. Enjoy!
5) Buffalo chicken pizza
This buffalo chicken pizza is a spicy twist on the classic dish. With tangy sauce and creamy blue cheese, it’s pure comfort food in every bite!
Ingredients:
- 1 batch of your favorite pizza dough (homemade or store-bought)
- 4 ounces of crumbled blue cheese (about 1/2 cup)
- 1/2 cup ranch dressing, plus more for drizzling over the top.
- 3 tablespoons unsalted butter, melted + more for brushing crust.
- 1/2 teaspoon garlic powder. *optional* (omit if you want to make this recipe Whole 30 compliant!). For homemade Whole 30 ranch dressing – 1 cup mayonnaise (I like avocado oil mayo), 1/2 cup coconut cream, 2 teaspoons apple cider vinegar, 1 teaspoon lemon juice, 1 clove of garlic minced. Mix all ingredients together and let chill in the refrigerator before using.)
- 1/2 cup of cooked shredded chicken
- 1 tablespoon of hot sauce (or more if you want it extra spicy)
Directions:
1) Preheat oven to 425 degrees Fahrenheit. Make homemade Whole 30 ranch dressing mentioned above if needed. (If not making homemade ranch dressing for this recipe, be sure to omit the dried parsley that is called for in this recipe.)
2) Roll out your pizza dough on a lightly floured and transfer it to a greased pizza pan or stone.
3) In a small bowl, mix together melted butter, garlic powder, and blue cheese. Spread the mixture over the pizza dough.
4) Bake in preheated oven for 15-20 minutes, or until crust is golden brown and cheese is bubbly.
5) Remove from oven and let cool for a few minutes before transferring to a serving plate.
6) Drizzle with ranch dressing and hot sauce, and serve warm. Enjoy!
There are so many ways to enjoy pizza, but these are our top 5 favorite recipes that will keep you on track with your healthy eating goals.
There are endless possibilities when it comes to pizza toppings. Whether you’re in the mood for a classic pepperoni and cheese pizza, or something a little more adventurous, the options are endless. So get creative, and have fun with your pizzas!
FAQs
What can you do if your pizza dough is not stretchy?
If you find your dough is not as elastic as you would like it to be, try adding a small amount of olive oil. Next time you make pizza dough, add 1-2 tablespoons of olive oil before kneading the dough ball. The oil will keep the dough moist, and allow for it to expand more easily when you stretch it.
If your pizza is too bland or isn’t crispy enough, try experimenting with different toppings. If you like spicier food, try adding hot sauce, peppers or jalapenos…if you enjoy sweeter flavors, try adding bites of fresh fruit!
There are many ways to make an ordinary simple pizza into something spectacular by just trying out new ingredients.
Does cold pizza dough stretch?
While you can technically stretch cold pizza dough, it is much more difficult to do so than if the dough is at room temperature.
If you’re in a hurry and need to get your pizza into the oven, try warming up your dough for a few minutes before attempting to stretch it. This will make it easier to work with and will give you a better crust.
How long should pizza dough rest before being stretched?
It is best to let pizza dough rest for at least 30 minutes before stretching. If you are in a hurry or find that your dough is too elastic or sticky to work with, try placing it on the pan and let it rest there while the oven preheats. This will give it more time to relax, making it easier to stretch when you’re ready.
What can you do if your pizza dough keeps shrinking back?
If your pizza keeps caving in after you’ve stretched it out into a crust, try working slower than you did last time. It may also help to use less flour next time while rolling out the dough.
Work gently with the edges of the crust so they don’t tear off during cooking…and be sure to let the pizza rest for a few minutes before transferring it to the oven. These tips should help your pizza dough hold its shape better next time you make it.
How do you prevent your pizza dough from sticking to the pan?
One way to avoid your pizza dough from sticking to the pan is by spraying it with cooking spray before adding the toppings. You can also try dusting the pan with a light layer of flour before adding the dough.
If your dough is still sticking, you can try using a fork or spoon to help loosen it before trying to stretch it out again.
Do you have any other tips for perfect pizza crust?
Yes! Our final tip for perfect pizza crust is to use a baking stone. If you have one, preheat it in the oven while the oven is preheating.
Once the dough is ready, place it on the hot baking stone and let it cook for 10-15 minutes. This will give your crust a crispy outer edge and a soft, chewy center. Enjoy!
What can you do if your homemade crust puckers?
If your homemade pizza dough puckered while baking in the oven, don’t worry; this is a common occurrence that occurs when air bubbles form under the top layer of the dough before cooking/baking.
The puckering should not affect the taste or texture of your pizza, and can easily be remedied by using a fork to poke a few holes in the dough surface before baking. This will allow the air bubbles to escape and will help to prevent the pucker formation.
Add the dissolved yeast to your dough mixture as you normally would with dry active yeast; however, be sure to omit adding sugar or honey to make room for your other ingredients such as olive oil or salt.
Is there an easy way to stretch dough without a rolling pin?
A rolling pin is one of those kitchen essentials that everyone should have; but if you don’t own one and still want perfectly shaped pizza dough, then a simple can of food or a wine bottle will do the trick very nicely.
I highly recommend using a clean and dry wine bottle for this purpose because it is long and thin, which gives you greater control over how much pressure you place on your dough, and is less likely to tear through the delicate gluten structure of your homemade pizza dough.
Is flour or water best for dusting surface?
Both flour and water are good options when it comes to dusting your work surface prior to rolling out your pizza crust; however, if you find that you have been unfortunate enough to experience pizza dough sticking to your work surface even after dusted with flour, try lightly wetting the area where the dough will be rolled out before dusting with flour.
This will help to create a slightly tacky surface that the dough will not stick to as easily.
How do you prevent homemade pizza dough from tasting yeasty?
If your homemade pizza does not taste delicious and slightly salty, it may be because of the yeast.
To reduce the chance of having a yeasty-tasting crust, dissolve regular active dry yeast in warm water (not hot) and let sit for 5 minutes.
Next, add the dissolved yeast mixture, olive oil and salt to your dough mixture as you normally would with dry active yeast; however, be sure to omit adding sugar or honey to make room for your other ingredients.
By following these tips, you will help to reduce the chances of your pizza dough tasting too yeasty.
How do you prevent pizza crust from being soggy?
One way to prevent your pizza crust from becoming too soggy is by using a baking stone (or even just an oven-safe baking dish) when cooking your pizza.
This will help to evenly distribute the heat and will result in a crispier crust. Another way to achieve a crispy crust is by preheating your oven (and baking pan/stone) for an hour prior to cooking your pizza. Finally, if you find that your crust is still a little too soggy for your liking, try brushing it with a little bit of olive oil or melted butter before baking.
Do you need to use cornmeal on pizza stone?
While it is not necessary to use cornmeal on a pizza stone, doing so will help to create a barrier between the dough and the stone and will help to prevent the dough from sticking. If you do not have cornmeal on hand, you can also try using flour or even non-stick spray.
How do you store leftover pizza?
If you have any leftover pizza, it’s best to store it in an airtight container in the fridge. Pizza will keep fresh for 2-3 days when stored in this manner. You can also freeze leftover pizza for later use; just be sure to wrap it tightly in foil or plastic wrap to avoid freezer burn. Frozen pizza will last for 3-4 months when stored properly.!
Pizza is one of those meals that everyone seems to love, and with good reason – it’s delicious! But what happens when you don’t feel like cooking? Or you want a pizza but don’t have any ingredients on hand?
That’s where frozen pizza comes in. While not quite as good as homemade, frozen pizza can be a lifesaver when you’re in a pinch.
And the best part is that there are now some really great-tasting vegan frozen pizzas available on the market, so no one has to miss out.
Here are four of our favorite vegan frozen pizzas:
1. Amy’s Vegan Margherita Pizza
This pizza is so good, it’ll have you singing for the pitter-patter of little tomato sauce-covered footsteps. Amy’s uses organic whole wheat crust, mozzarella-style vegan cheese, and their own rich tomato sauce that makes for a delicious combination in every bite.
2. Popsicle Vegan Roasted Vegetable Pizza
I love this one because I always want to eat my veggies when they’re roasted! The vegetables are super flavorful with hints of rosemary and thyme mixed in, while the chunky red sauce is perfect for dipping if desired! It comes with two pizzas per box (4 total), making it great value as well. Yum yum!
3. Daiya Cheeze Lover’s Pizza
This vegan cheese lover’s dream come true is perfect for those times when you want a pizza but don’t want to spend the time making it yourself. Daiya shreds up their own delicious vegan cheese and tops it with a trio of your favorite toppings – pepperoni, sausage, and bacon (yum!).
4. Tofurky Roast & Veggie Pizza
This pizza is perfect for all you Tofurky fans out there. The crust is made with organic wheat flour, yeast, and salt, while the toppings include roasted red peppers, green onions, artichokes, Kalamata olives, and of course Tofurky slices.
So there you have it – four great vegan frozen pizzas that will satisfy your pizza cravings and your love for delicious vegan food!
Of course, you can always use this base recipe and add whatever toppings you like. Also, if the crust is a little too thick for your liking, just roll out the dough a bit more before topping and baking.
Be sure to cut down on baking time by preheating the oven beforehand (and keep an eye on it from thereon because every oven varies). Enjoy!
Final Words about How to stretch pizza dough
If you’re a pizza lover and want to learn how to stretch pizza dough, this is the post for you! We’ve provided step-by-step instructions on stretching pizza dough.
We hope you found these tips helpful and that they will make your next batch of homemade or store-bought pizza crusts even better!
After following these simple steps, you should now be able to stretch pizza dough like a pro!
With the right technique and equipment, your homemade pizzas will taste just as good or better than those from your favorite takeout joint.
Now that we’ve shown you how easy it is, why not try it for yourself? We encourage all of our readers to share their success stories with us so we can give them credit in this blog post.
Further reading:
")

